UTILITIES |
Within Utilities there are included some commands that provide information or
allow actions over both the geometry and the mesh. Others can act over the whole project.
Undo |
![]()
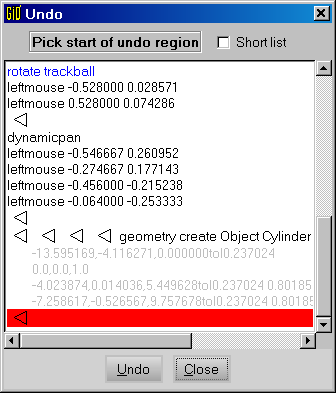
Undo window
This command allows the user undo any previous commands executed since the last time the project was saved or read. To do this, the user must select in the undo window the set of commands that have to be undone.
Preferences |
![]()
![]()
Note: There are some pre-definitions or ways of working that can be set in GiD. They can be
set in two ways: via the Preferences window or with the Variables command, in Utilities
menu. This second option is only available in the Right Buttons or the Contextual menu.
Almost all the preferences variables are present in Preferences window, but some advanced ones are only
available in Variables command.
In the following description, the different Preferences options in Preferences window are shown, giving
their associated variables.
The first group of Preferences (general preferences) is used to set different ways of working with GiD:
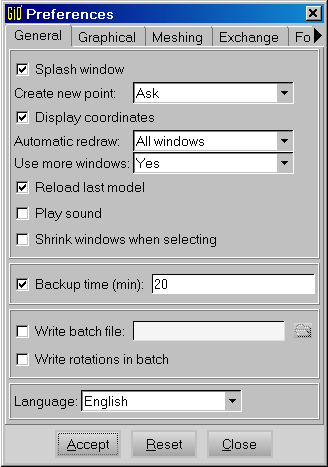
General preferences
-
Splash window:If this option is set, when program is opened again a welcome window is displayed. Variable:SplashWindow. Values: 1,0. Default is 1 (Yes). -
Create new point:It alters the way in which the points are entered in GiD (see section Point definition). Options are:-
Always:If trying to create a new point in the vicinity of an existing one, the new point is always created. -
Ask:If trying to create a new point in the vicinity of an existing one, GiD asks the user whether to make use of the existing point or create a new one. -
Never:Only allows selecting existing points. It can be changed interactively when in creation point mode by settingNo joinuntil all points are entered.
CreateAlwaysNewPoint. Respective values: 1,0,-2. Default is 0 (Ask). -
-
Display coordinates:If set, GiD shows the coordinates in the graphical window. Variable:DisplayCoordinates. Values: 1,0. Default is 1 (Yes). -
Automatic redraw:If this option is not set, redraws caused by window expositions, or by internal functions are not performed. This avoids spending a lot of time for large models. Variable:AutomaticRedraw. Values: 1,0. Default is 1 (Yes). -
Use more windows:Depending on the selected field,yes,noorbeginner, some options are asked to the user inside a new window or with a message in the regular messages window. Variable:UseMorewindows. Values: 1,0,2. Default is 2 (beginner). -
Reload last model:If set, when GiD is opened reload the last model that have been saved before. Variable:ReloadLastModel. Values: 1,0. Default is 0 (No). -
Play sound:If this option is set, a sound is played to indicate a task has finished. Variable:Sound. Values: 1,0. Default is 0 (No). -
Shrink windows when selecting:If this option is set, some windows are resized when selecting, in order to facilitate the selection. Variable:SmallWinSelecting. Values: 1,0. Default is 0 (No). -
Backup time:If this option is set and a model name is given, model is saved automatically into that model name with the frequency given (in minutes) Note: Mesh is not saved into the backup to save time. Variable:BackUpMinutes. Default is 20 minutes. -
Write batchfile:If this option is set and a filename is given, all commands used during the current session are saved into this file. It can be executed later by means of a script file with the predefined commands to be run in GiD (see section Batch file). Variable:BatchFileToWrite. -
Write rotations in batch:If this option is set (and so the previous one and a filename is given), all dynamic rotations and movements are stored in the batch file. This allows to see these movements when reading this batch file with 'Read batch window'. Variable:WriteRotationsInBatch. Values: 1,0. Default is 0 (No). -
Language:This option sets the language GiD is working with. RamTranslator is used to deal with mesages catalogues for GiD and problemtypes translation (to see more information about RamTranslator visit http://www.gidhome.com).
The second group of preferences (graphical) are used to set different ways of visualizing the model.
They do not change the geometry and the model information. These preferences are:
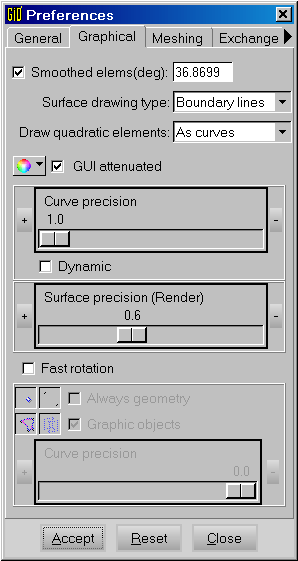
Graphical preferences
-
Smoothed Elements:If this option is set, when rendering a mesh (see section Render) the intersection between elements with a small angle between their normals will be illuminated as if it was a continuous solid. If it's not set, illumination is made considering every element as planar. Variable:LightSmoothedElems. Values: 1,0. Default is 1 (Yes).
The angle (in degrees) is the maximum angle between normals of two elements to allow smooth lighting between them. If angle is greater than this ont, one edge is drawn between them. Variable:CosSmoothedElems. Saved as the co sinus of this angle. Default is 0.8. -
Surface drawing type:Lets the user choose how to draw the surfaces when in wire frame (normal) mode. Options are:None:Surfaces are not drawn.Boundary lines:One magenta line is drawn for every contour line. This set of lines has a small offset towards the interior of the surface.Isoparametric lines:Two yellow lines are drawn for every NURBS surface. The one foru=0.5and the one forv=0.5.Both:Draws both modes.
DrawSurfaceMode. Default is 1 (Boundary lines). -
Draw quadratic elements:With this option user can specify how to visualize quadratic elements. Options are:No:If this option is set, quadratic elements are drawn as they were linear.As lines:If this option is set, elements are drawn taking to account all quadratic nodes, but edges are drawn using straight lines between nodes.As curves:If this option is set, elements are drawn taking to account all quadratic nodes, and edges are represented using quadratic curves. This option is more realistic, but it may make slower some visualization aspects when dealing with large models.
BackgroundColor. Value: hexadecimal RGB char. And others. Default is (255,255,255) (white). -
Change color: It is possible to change the default color of
several things in the program with this option. One possibility is to
change the background color of the GiD graphical window. Other
possibilities are the color of the entities in normal mode (no
render). Variable:
It is possible to change the default color of
several things in the program with this option. One possibility is to
change the background color of the GiD graphical window. Other
possibilities are the color of the entities in normal mode (no
render). Variable: BackgroundColor. Value: hexadecimal RGB char. And others. -
GUI attenuated:Set the GUI appearance to standard or attenuated color. The change is updated after restarting GiD. -
Curve precision:This option gives the precision used to draw curves. The internal definition of curves does not change. In the preferences window, it is possible to dynamically change the drawing of a curve to test the precision (selectingdynamicoption). Variable:CurvePrecision. Values: 1.0 to 0.0 from best to worst. Default is 1.0. Surface precision:This option gives the precision used to draw surfaces in render mode. The internal definition of surfaces does not change. Variable:SurfacePrecision. Values: 1.0 to 0.0 from best to worst. Default is 0.6-
Automatic rotation center:If this option is active, on each 'Zoom In' / 'Zoom Out' / 'Pan' the nearest point of the geometry, or mesh, to the screen center will be selected as rotation center for the next rotations. This variable is also present in theUtilities -> Variablesright buttons menu and inside theRotation -> Centercontextual menu (right mouse button). If a newRotation centeris selected (see section Rotate center), then this option is deactivated.Fast rotation:If this option is set, some options are able to be chosen. These options will apply only when rotating. Options are:-
Points, lines, surfaces, volumes:To draw or not to draw this type of entity when rotating. Variables: the same. Values: 0,1. Default is 0 (No). -
Always Geometry:If this option is set, when viewing the mesh and rotating, the geometry is drawn instead. Variable:UseAlwaysGeom. Values: 0,1. Default is 0 (No). -
Draw graphic objects:If this option is not set, when rotating the geometry, some graphical and temporal objects like normals or materials or conditions symbols are not drawn. Variable:DrawGraphicObjects. Values: 0,1. Default is 1 (Yes). -
Curve precision:The same as general itemCurve precision, but applied only when rotating. Variable:CurvePrecision. Values: 1.0 to 0.0 from best to worst. Default is 0.8
FastRotation. Value: 0,1. Default is 0 (No). -
The third group of preferences are meshing options:
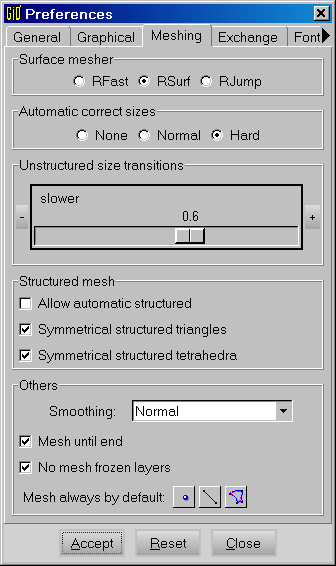
Meshing preferences
-
Surface mesher:GiD can use three kinds of surface mesher. They are:-
RfastThe most efficient in speed and reliability. With deformed surfaces can give distorted elements. -
RsurfMeshes are generated directly in the space. Quality is better but it is slower and can fail for distorted surfaces. -
RjumpMeshes are generated directly in the space, and contact lines between surfaces which are almost tangent (less than 10 degrees between tangent vectors) are skipped when meshing. Contact points between almost tangent lines (less than 10 degrees between tangent vectors) are skipped too.
With this surface mesher it can be reached meshes with less elements than with the other meshers, because of the relative independence on the geometrical surfaces dimensions. However, it is slower and can fail for distorted surface patches.
If any entity has Skip or NoSkip Mesh Criteria (see section Mesh criteria), the surfaces involved are meshed withRjumpmesher, even if an other mesher is set in this window.
These mesh generators are based on the advancing front generation mesh technique in order to improve speed and portability.
Variable:SurfaceMesher. Values: 0 (Rfast) ,1 (Rsurf) and 4 (Rjump). Default is 0 (Rfast).
Note: GiD can internally try another mesher when one of them fails to generate the mesh for one surface. -
-
Automatic correct sizes:This preference let GiD to make an automatic mesh sizes correction when meshing begins.
IfNoneis set no sizes correction is made; ifNormalis set a sizes correction is made, according to the ggeometrical entities sizes, and to the compatibility between meshing sizes of neighbour entities; ifHardis set the Normal correction is made and, furthermore, an automatic chordal error criteria is applied to assign sizes to surfaces which are contour of come volume, so as to improve volume meshes. Variable:AutomaticCorrectSizes. Values: 0 (None) ,1 (Normal) and 2 (Hard). Default is 1 (Normal). -
Unstructured size transitions:It controls whether the transitions between different element sizes are slow or fast. Variable:SizeTransitionsFactor. Values:.0 from slower to faster transition. Default is 0.6. -
Allow automatic structured:If this preference is set, functions likeAssign sizes by Chordal Errorwill define some surfaces as structured with highly distorted elements over them. Variable:AllowAutomaticStructured. Values: 0,1. Default is 0 (No). -
Symmetrical structured triangles:If this preference is set, structured triangles meshes will be topologically symmetrical. Variable:SymmetricalStructuredTriangles. Values: 0,1. Default is 1 (Yes). -
Symmetrical structured tetrahedra:If this preference is set, structured tetrahedra meshes will be topologically symmetrical. Variable:SymmetricalStructuredTetrahedra. Values: 0,1. Default is 1 (Yes). -
Smoothing:Options for smoothing to enhance the mesh after the generation. Options are:Normal:only the standard smooth is performed.HighAngle:an additional smooth with angle criteria is performed.HighGeom:an additional smooth with chordal error criteria is performed.
HighQualitySmoothing. Values: 0 (Normal), 1 (HighAngle) and 0.0 to 2 (HighGeom). Default is 1 (HighAngle). -
Mesh until End:If this preference is set, the mesh generator will continue until end although there are surfaces or volumes that cannot be meshed. Variable:MeshUntilEnd. Values: 0,1. Default is 1 (Yes). -
No Mesh Frozen layers:If this preference is set, entities owning to a frozen layer won't be meshed. Variable:NoMeshFrozenLayers. Values: 0,1. Default is 1 (Yes). -
Mesh always by default:Changes the default meshing criteria. Entities will always be meshed even if they have higher entities. Example: If surfaces are checked, when meshing a volume, volume elements and surface elements will be obtained. Variable:ForceMeshEntities. Values: 0 (No entity) ,1 (Points), 2 (Lines), 3 (Points and Lines), 4 (Surfaces), 5 (Points and Surfaces), 6 (Lines and Surfaces),7 (Points, Lines and Surfaces), . Default is 0 (No entity).
The fourth group of preferences are the geometry exchange (import and export) options:
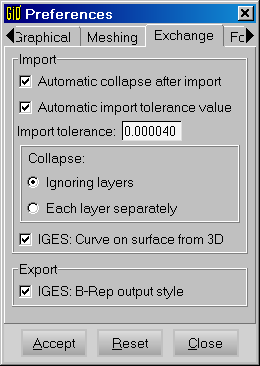
Exchange preferences
Import options:
-
Automatic Collapse After Import:If this option is set, after reading one IGES file, one global collapse is made. If not, every surface and line will be independent from each other. Variable:AutoCollapseAfterImport. Default is active (1). -
Automatic Import tolerance:When importing a file or collapsing, the points closer than this distance are considered to be unique (see section IGES). Lines and surfaces can also be collapsed. Variable:ImportTolerance. Default is 0.001. -
Collapse-
Ignoring Layers:entities are collapsed also if they belong to different layers. -
Each layer separately:entities in different layers are not collapsed. (Entities belonging to frozen layers are never considered).
CollapseIgnoringLayers. Value: 0 (Each layer separately), 1 (Ignoring Layers). Default is 1 (Ignoring Layers). -
-
IGES: Curve on surface from 3D:If this option is set, the IGES curves on surface entities are created from the direct 3D space definition (recommended); if the option is not set, IGES curves are created form the surface space parameter definition. Variable:IGESCurveOnSurfaceFrom3D. Value: 0 (space parameter definition), 1 (3D space definition). Default is 1 (3D space definition).
Export options:
-
IGES:B-Rep output style:If this option is set, then exported IGES entities are written with Boundary Representation Solid Model style, else the surfaces are written as separated trimmed surfaces, whitout topological information. Variable:IGESSolidsManifoldBRep. Value: 0 (no B-Rep output style), 1 (B-Rep output stype). Default is 1 (B-Rep output style).
The fifth group of preferences deals with the fonts used inside GiD:
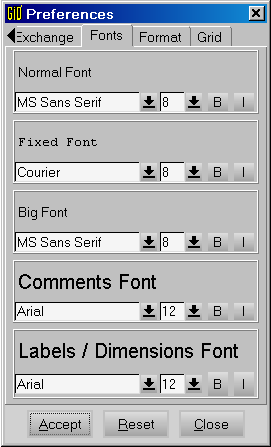
Font preferences
-
Normal font:This is the font normally used inside GiD. -
Fixed font:This font must have the same spacing for every letter. It is used in places where this property is necessary. -
Big font:Used in some dialog boxes. -
Comments font:Used for comments. -
Labels/Dimensions font:Used in labels and dimensions.
The sixth group of preferences deals with numerical formats used inside GiD:
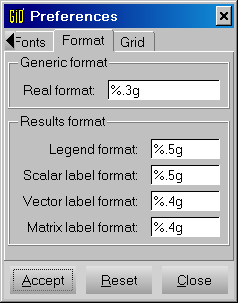
Format preferences
-
Results format:This option refers to numerical formats in results (Postprocess). -
Generic format:This option refers to numerical formats in other GiD utilities (for example in the coordinates display).
The seventh group of preferences contains Grid options (see section Grid):
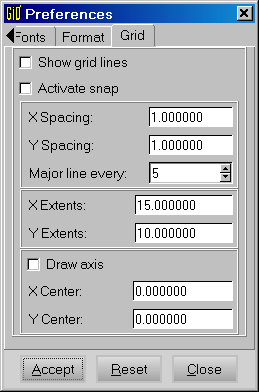
Grid preferences
-
Show grid lines:If this option is set, grid lines are shown. Variable:Grid(Show). Value: 0,1. Default is 0 (No show). -
Activate snap:If this option is set, snap is activated. Variable:Grid(Active). Value: 0,1. Default is 0 (No activate). -
X/Y Spacing:Theses options determine the spacing between grid lines in X and Y direction. Variable:Grid(SpacingX))andGrid(SpacingY)). Default value is 1.0 in both directions. -
Major line every:This option specifies the number of lines between principal lines in the grid. Variable:Grid(MajorLineEvery). Default value is 5 lines. -
X/Y Extents:Theses options determine the extension of grid in X and Y direction. Variable:Grid(ExtentsX))andGrid(ExtentsY)). Default value is 15.0 in X direction and 10.0 in Y direction. -
Draw axis:If this option is set, 2d axis are shown in the grid (x and y). Variable:Grid(DrawAxis). Value: 0,1. Default is 0 (No axis drawn). -
X/Y Center:Theses options determine the position of the center of the grid. Variable:Grid(CenterX))andGrid(CenterY)). Default value is 0.0 (center is in x=0.0,y=0.0).
Layers |
g src="icons/mm-layers.gif">
![]()
![]()
Layers are a way to split a complex drawing into separate pieces. The idea is that any entity can belong to one layer or to none (an entity cannot belong to more than one layer). Then, it is possible to view only some layers and not others. It is also useful to easily select entities in the graphical window.
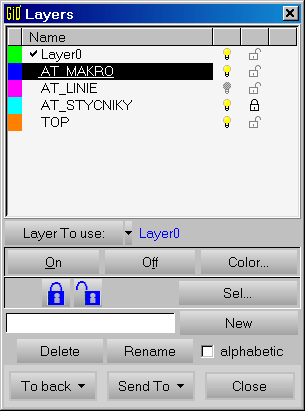
Layers window operations
Commands related to layers are:
-
Layer To use:Selects a layer to be used as default. All the new entities will be created within this layer. All the layers are capable of being selected.
Next to theLayer To usebutton, there's an arrow facing down. This is a menu which lets you select a point, a line, a surface or a volume; the layer to which it belongs that entity, will be set as the default layer. -
On:Entities belonging to this layer will be drawn and can be selected in the graphical window. -
Off:Entities belonging to this layer will not be drawn and cannot be selected in the graphical window. -
Color:Change color to layer. This color is used when making a render (see section Render). Color can also be chose clicking on layer color (placed at the left hand in layers list). -
Lock/Unlock

(Freeze/Unfreeze):Entities belonging to this layer will be drawn but cannot be selected in any way. When copying entities (see section Copy) and sharing old entities, entities belonging to frozen layers are not taken into account and not even a range of numbers (see section Entities selection) can be selected. The opposite command isUnlock, where the entities belonging to this layer can be selected, copied and shared. -
Sel...:In the layer window, there is the optionselectthat allows the selection of several layers. This can be useful when using a large number of layers. After pressingSel...a new window appears to allow the input of a pattern that will match the layer's name. In this pattern, characters * and ? are wildcards that match any characters or character, respectively, in the layer's name. So, the patternselectwill matchselect,selection,select-surfaceand so on. -
New:Creates a new layer. If name is given the layer is called "Layer#". The new layer will be used as the default layer until the end of the session or until it is changed. -
Delete:Deletes a layer. A layer can only be deleted if it has no entities in it. -
Rename:Changes the name of a layer. -
alphabetic:If this option is set, layers are sorted alphabetically (by name). -
To back:Sends entities to the back of its layer. When an entity is "at the back" it's not visible and cannot be selected, moved, copied or deleted. To bring again the entities of a layer "to the front", select a layer and choose theBring to frontoption, from theTo backmenu. There is another option,Bring ALL to front, which brings to front all entities of all layers.
If the flagOppositeis set, entities which are not selected will go to the back.Sent To:Moves entities to a new layer. No new entities are created. They are only moved from one layer to another. When choosing, in geometry mode,point,line,surface,volumeorall, optionallcan be used only to select entities in the graphical window and change all the entities in the dynamic box to the new layer. In mesh mode, it is possible to choosenodes,elementsorall.
Especial optionAlso lower entitiespermits to send to the layer also the entities that are lower entities of the selected ones.
Example: If this flag is set and one surface is selected, its lines and its points are also sent to the layer. -
Close:Closes the Layers window.
Important: The mesh generation does not depend on the state
of the layers when the generation is performed (see section Layers). All
layers are meshed and every node and element will be assigned to the
layer where the original geometrical entity was. The only exception to
this rule is for the case of frozen layer if the option No mesh
frozen layers is selected (see section Preferences->Meshing).
Tools |
![]()
In this menu there are some options to change the windows appearance, and some tools related with diferent aspects of GiD.
Toolbars |
![]()
In this menu, user can customize GiD toolbars. They can be inside another window or independent or disappear.
Selecting this option the following window appears:

Toolbars view and position configuration window
With this window the position: inside, outside, top left, bottom right, etc. of following item can be configured, or switched on and off. GiD toolbars are:
- Right buttons: These are the buttons that appear usually in the right side of the windows. They can perform most of the actions of the program.
- Command line: Inferior line where it is possible to write commands.
- Up menu: Menus located over the graphical window.
- Geometry & View bar and Standard bar: icon toolbars used to perform certain operations. Use middle or right button over an icon to get help.
- Macros toolbar: icon toolbar where default and user macros are placed.
Note: To make the Up menu appear again, shortcut Control-U or
Control-Shift-u can be used.
Save window configuration |
![]()
It is possible to save a window configuration into a file. Then if GiD is open again with option -c (see section INVOKING GiD) and this file, the windows are opened in the same place and size.
Move screen objects |
![]()
This option allows the user move screen objects (objects that does not own to the model), such as axes, comments, legends, etc...
Coordinates window |
![]()
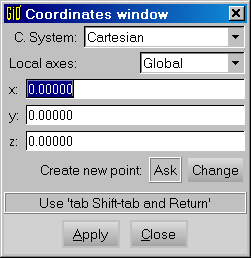
Entering coordinates window
This option opens a window used to enter points (see section Point definition). It can be used in any place where it is possible to enter a point.
To accept one point in this window, press Apply or press the Return
key.
Option Coordinate system allows the user select between:
- Cartesian: Cartesian coordinate system.
- Cylindrical: User enters the radius in XY plane, the anti-clockwise angle in plane XY from x axe (theta), and the z coordinate.
- Spherical: User enters the radius, the anti-clockwise angle in plane XY from x axe(theta), and the angle with z axe(phi).
Option Local axes allows the user choose:
- Global: Global axes.
-
Relative center: User defines a center of coordinates. All new points
created with this window will be related to this center. In the window where
the relative center is entered, user can select with button
Picka point from graphical window. - Relative last: Last point entered is the relative center of coordinates.
- Define new...: It allows the user define a new local axes. Once defined, user can select it.
- Any local axes: All local axes defined with See section Local axes, will be listed here. Points entered will be related to these axes.
Create new point shows the current way of entering points. Button Change
opens the preferences window (see section Preferences->General) where it can be changed.
Button Pick allows the user select a point from the window and it is inserted in
the point fields. Then it can be edited and used.
Read batch window |
![]()
A batch file can be read to execute some functions (see section Batch file) or
to create an animated view of these operations. This latter case can be performed
with the Read batch window.
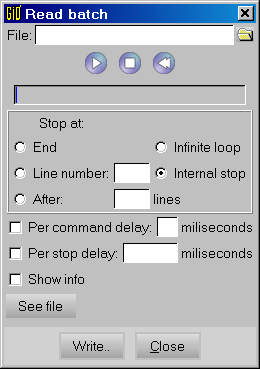
Read batch window
Once a file is selected, it is possible to execute it interactively and make it stop
in some interesting parts. To allow all the movements (rotations and so on) be
executed in the same way that originally, option Write rotations in batch:
must be set in preferences (see section Preferences->General), when creating the batch.
There are several ways to stop the running batch. One of them is to include stops in
the show file section with the Mark break button, and selecting
Internal stop. These marks can be saved in the batch file with button
Write....
Option Show info lets the program write all the usual messages in the GiD
messages window.
Comments |
![]()
This facility is included to add comments to the pictures obtained through GiD
(see section Print to file). Three lines are allowed and with the Comments button
the user can impose their printing on the screen to foresee mistakes or perform
changes before printing.
Animate Controls |
![]()
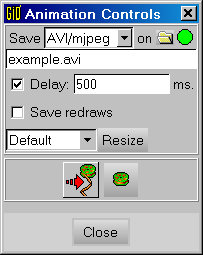
Animate controls window
This windows allows the creation of animations while using GiD.
Any of these format can be selected: MPEG, AVI True Color, AVI 15bpp (reduced number of
colors: 32768) and GIF. AVI with MJPEG compression is also supported.
After giving a name and a delay time between frames (for
20 frames per second, a delay of 1/20 = 50 ms. should be entered) the process can start
just clicking on the start button ( film roll and arrow button), the green
led will change to red.
The user can add frame by frame the pictures he wants into the animation file
just clicking on the film roll and arrow button.
The option Save redraws tells GiD to save every redraw automatically into the
animation file, so no user intervention is needed to store frames.
The animation can be finished at any time just pressing the closed film roll button,
the red led will change to green.
Note: To avoid problems when trying to view an MPEG format animation in Microsoft Windows, it is strongly recommended to use the Default menu to select a 'standard' size and press the Resize button. The graphical window will change to this 'standard' size. After finishing the animation, just selecting Default on the menu and pressing the Resize button, the previous size will be restored.
Note: The AVI files with MJPEG compression, can be viewed with xanim on
Linux and unix machines, and with DirectX 8.x installed in Microsoft Windows machines.
Macros |
![]()
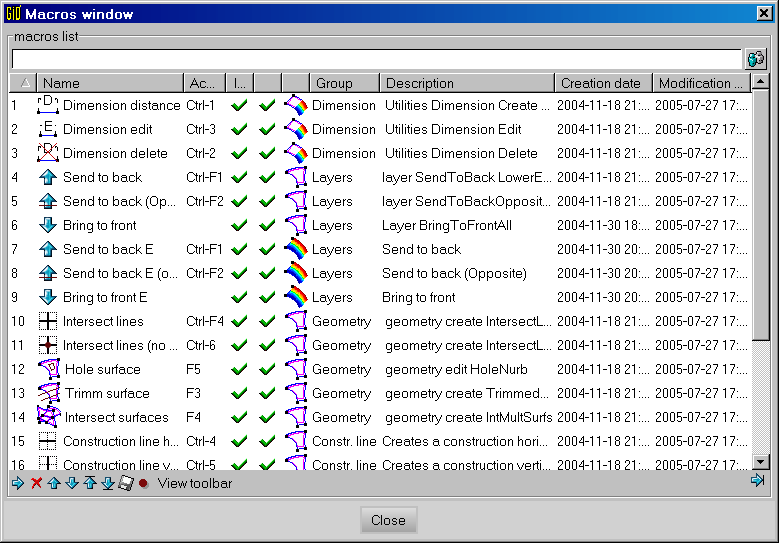
Window that allows the creation and recording of macros
Window 'Macros' permits to create sequences of commands and give a name to them. This group of commands can also be recorded from one execution set inside the program.
It is possible to assign a keyboard shortcut to a given macro.
Note: Macros are considered as a user preference and not
related to the active model. So, to transfer a set of macros from one
user to another it is necessary to check the files: gid.ini or
.gidDefaults.
Selection window |
![]()
![]()
In those functions where user has to select some entities (creation of a surface or a volume, copy of entities ...) it is possible to use the selection window. The selection window lets you take control of the selection process.
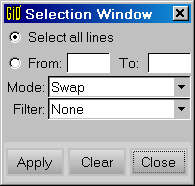
Selection window
Note: the option Sel window is only available in the mouse menu during the selection process.
The selection window has the following options:
Select all: if this option is chosen all entities are selected. If a filter is selected, the filter is applied to all entities.From, To: this option lets the user select a range of entities. If a filter is selected, the filter is applied only to that range of entities. To see the id numbers of entities, use theLabelcommand (see section Label).Mode: there are three selection modes:- Swap: if you select an entity which is already selected, the entity deselects, and vice versa.
- Add: in this mode it's impossible to deselect an entity. Only new entities are added to the current selection.
- Rem: in this mode it's impossible to select an entity. This mode is used to remove entities of the current selection.
Filter: if a filter is selected, only the entities that accomplish with the filter criteria will be selected. This menu changes depending on what type of entity is being selected:
- Points
- Higher entities: user is asked for a value, and all points with this higherentity number are selected (higherentity number is the number of lines which point belongs to).
- Label: user can select all points which Label is shown or not (On or Off Type).
- Material: all points with a chosen material assigned are selected.
- Condition: all points with a chosen condition assigned are selected.
- Lines
- Higher entities: User is asked for a value, and all lines with this higherentity number are selected (higherentity number is the number of surfaces which line belongs to).
- Label: user can select all lines which Label is shown or not (On or Off Type).
- Material: all lines with a chosen material assigned are selected.
- Condition: all lines with a chosen condition assigned are selected.
- Min. length: selects only the lines which its length is smaller than the given length.
- Max. length: selects only the lines which its length is bigger than the given length.
- Entity type: selects only the lines which type of line is the one selected: StLine (Straight Line), ArcLine, PolyLine or NurbLine.
- Surfaces
- Higher entities: User is asked for a value, and all surfaces with this higherentity number are selected (higherentity number is the number of volumes which surface belongs to).
- Label: user can select all surfaces which Label is shown or not (On or Off Type).
- Material: all surfaces with a chosen material assigned are selected.
- Condition: all surfaces with a chosen condition assigned are selected.
- Entity type: type of surface.
- Volumes
- Label: user can select all volumes which Label is shown or not (On or Off Type).
- Material: all volumes with a chosen material assigned are selected.
- Condition: all volumes with a chosen condition assigned are selected.
- Entity type: type of volume.
- Nodes
- Label: user can select all nodes which Label is shown or not (On or Off Type).
- Condition: all nodes with a chosen condition assigned are selected.
- Elements
- Label: user can select all elements which Label is shown or not (On or Off Type).
- Material: all elements with a chosen material assigned are selected.
- Condition: all elements with a chosen condition assigned are selected.
- Min Angle: number of minimum degrees accepted (see section Mesh quality).
- Max Angle: number of maximum degrees accepted (see section Mesh quality).
- Min Edge: number of minimum edge length accepted (see section Mesh quality).
- Max Edge: number of maximum edge length accepted (see section Mesh quality).
- Shape quality: number of minimum shape quality accepted (see section Mesh quality).
- Minimum Jacobian: number of minimum jacobian accepted (see section Mesh quality).
- Entity type: type of element. (see section Element type)
- Points
Clear: Clears the current selection.
Calculator |
![]()
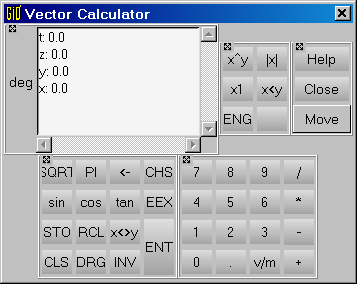
Vector calculator
This option opens a scalar and vector calculator. It has its own help on right mouse button.
It's possible to transfer scalar and vector and points and distances from and to the calculator and the main graphical display.
Report |
![]()
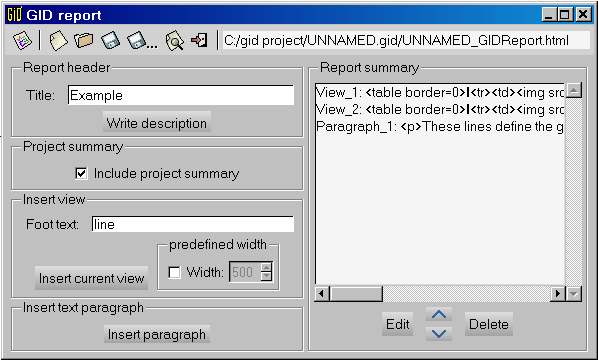
Report window
This option creates a report in html format, in which user can add figures, comments, titles, etc. This report can be saved into a file, and can be reloaded in other GiD session to edit it or to add more information to it.
Notes |
![]()
This is a simple text editor to write small notes related to the model. The content is saved in a file named 'modelname'.txt, with utf-8 encoding.
Copy |
![]()
![]()
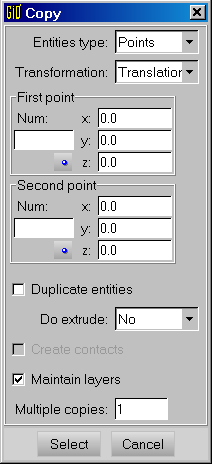
Copy window
Copy is a general function that allows the user select a group of entities
and copy them with a movement that can be translation, rotation,
mirror, scale or offset. The process is:
Select the type of entities to copy: point, line, surface
or volume, when being in geometry mode, or option nodes or
elements, when being in mesh mode. All the lower entities that
belong to the selected ones will be automatically computed.
The type of movement needs to be chosen and
the parameters for the movement are defined. Options are:
- Rotation: It is necessary to either enter two points in 3D or one point in 2D. These two points define the rotation axis and its orientation. In 2D, the axis goes from the defined point towards z positive. Enter the angle of rotation in degrees. It can be positive or negative. The sense is defined by the right hand rule. In 2D, the sense is counter-clockwise.
- Translation: It is defined by two points. Relative movements can be obtained defining the first point as 0,0,0 and considering the second point as the translation vector (see section Point definition).
- Mirror: It is defined by three points that cannot be aligned. These points form a plane that is the mirror plane. In 2D, the mirror line is defined by two points.
-
Scale: It is defined by a center and a point. Every coordinate of the point
is the scale factor for every
x,y,zaxis. Scale factor greater than one, increases size, while less than one decreases the size. It may also be negative, changing the sign of the corresponding coordinates. -
Offset: It is defined by one positive or negative scalar
magnitude. It will move each entity in the sense of its normal, the
magnitude given. In 2D, normal is considered to lie in the
z=0plane. This option works either for lines, surfaces or for mesh elements. -
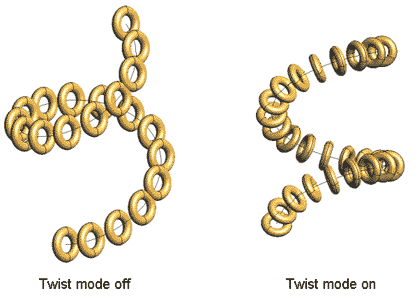
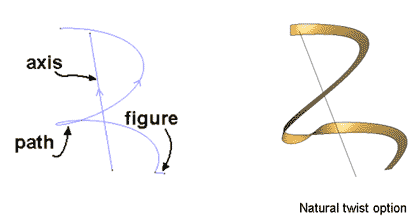
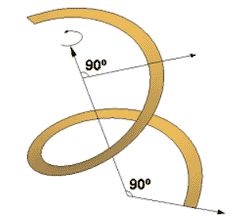
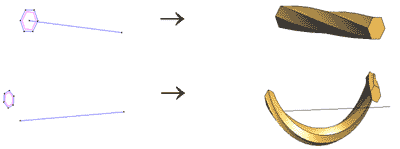
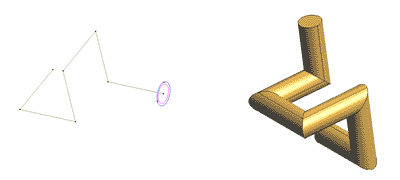
Sweep: This is an option for copying figures along a line (path line). You can just copy the figures (and then specify a number of copies) or extrude them. Both methods have basically the same options.
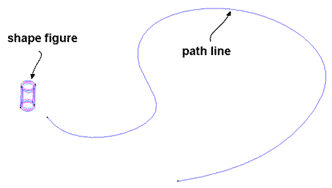
The extrusion (and the copy) starts always on the start point of the path line. If you select 'twist mode' to be on, then the relative position of the figure to copy respect to the start of the path line is conserved along the line.
-
Align: This is an option to move figures from a generic position to the desired one.
Set the new location specifying three source and destination points: the first point defines the exact destination of the source point, the second point is not necessarily the exact destination, only a point over the destination straight line, the third point is not necessarily the exact destination, only a point over the destination plane
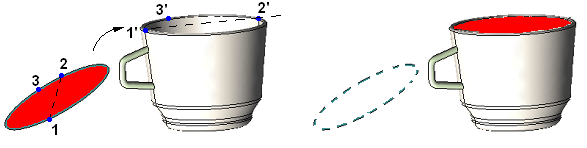
Tool to align parts
Other available options are:
-
Extrude: This option can be set to either lines or surfaces or
volumes. When a movement is selected, the copy is made and lines
connecting the old and the new points are created. These lines will be
either straight lines or arcs depending on the movement type. If
extrude surface is chosen, NURBS surfaces connecting old and new lines
will also be created. If
Volumesis chosen, the volume contained between old and new surfaces is also created. This option is not allowed when copying volumes. -
Mcopy: Selecting this option and giving the number of repetitions, the operation
selected is performed this number of times. This option is not available for
mirror. - Create contacts: Creates separated contact volumes (see section Contact volume creation) for every copied surface. This option is only available when copying surfaces.
-
Duplicate entities: If this option is not set, when an entity after the
copyoperation occupies the same position than an existing one that does not belong to a frozen layer, both entities are converted into one.
Maintain layers: If this option is not set the new entities created will be placed in the layer to use; otherwise, the new entities are copied to the same layers as their originals.
Note: Entities belonging to a frozen layer (see section Layers), are not checked when sharing old entities.
Move |
![]()
This command works like the command Copy but moves the entities instead of
copying them. The program checks automatically if some of the entities must be copied
instead of moved (for this reason, these entities belong also to non-selected
entities of higher level) and perform the corresponding operation.
Options like Extrude, Multiple copy and Create contacts are
disabled for movements.
Status |
![]()
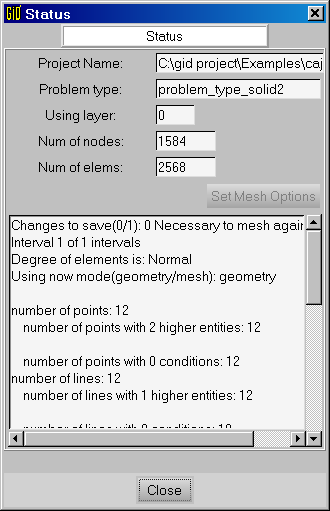
Project status window
Option Status gives information about useful general data of the project.
List |
![]()
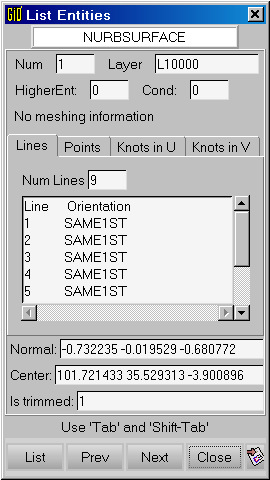
List entities window
Command List gives information about the selected entities. This
information is read only.
If option Mass is checked, information about physical properties
is given: length of lines, center of masses, area of surfaces, volume of
solids. It works either for the geometry or for the mesh.
All this information can be sent to the active report (see section Report) using the button
 .
.
Renumber |
![]()
When creating new entities, the label of the new entity will be the lowest number greater than 0 that still does not exist for this entity type. If an entity is deleted, a gap is left in the label's list. This gap would be filled with new entities but it is possible to renumber the geometry to change the former entity labels. There are no problems with materials and conditions applied to entities.
In geometry mode, the renumbered entities are the geometrical ones. In mesh mode, the renumbered entities are the mesh ones. In this case, renumbering not only fills the gaps in the labels list but also changes the node numbers so as to minimize the difference of node numbers within each element. This can be useful when the calculating module uses band or skyline storage methods.
Note: When generating a mesh using GiD it is not necessary to use this command because it is automatically applied when generating the mesh.
Id |
![]()
This command gives the label and coordinates of an existing or new point. Different options of getting an existing point are available in Contextual menu.
Signal |
![]()
With this option, the user can select one entity (point, line surface or volume), and a pair of crossed red lines signal the center of the entity in the graphical window.
They must be existing entities, except the especial case of point or nodes, where they can be existing or defined with any of the usual methods.
Option Superpose Lines (in Contextual menu) is useful when render mode is used. Depending
whether it is set or not, crossed red lines will be always in front or the object or
they can be partially hidden by the model.
Swap normals |
![]()
This command can be applied to lines or surfaces (in geometry mode) or to elements (in mesh mode). A selection is made (see section Entities selection), and the orientation of selected entities is inverted.
Viewing commands (zoom, rotation, etc.) can be applied and the normals remain on the screen.
When this command is applied to surfaces or mesh elements, user can choose one of these options:
Select:inverts the sense of the normals of the selected surfaces.Make coherent:inverts normals of all selected surfaces or elements so as all of them have its normal to the same sense of adjacent entities. This sense is arbitrary but common to all adjacent entities.Select by normal:user is prompt to enter a vector and all selected entities normals are swapped so as to have their normal in the same sense (dot product positive) as the given vector.
Note: With the option Color set (option available in the Contextual mouse menu), all surfaces
or elements are drawn in filled color. Their front side will be drawn in their regular color,
and their back face in yellow.
Note: Volumes are correctly oriented by GiD, regardless of their surface orientation.
Distance |
![]()
Command Distance gives the distance between two existing or new points.
Dimensions |
![]()
With the dimensions option it's possible to add textual information to your model. That information can be changed of layer or deleted.
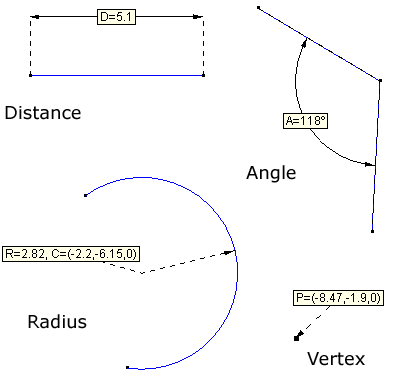
There are the following options:
![]()
- Vertex: shows the coordinates of a vertex. Click over an existing point and then click where you want the dimension to be written.
- Distance: shows the distance between two points. You'll have to select two points and then click where you want the dimension to be written.
- Angle: shows the degrees of an angle. You'll have to select three points and then click where you want the dimension to be written.
- Radius: shows the center and radius of an arc. You'll have to select an existing arc and then click where you want the dimension to be written.
- Text: shows a text string defined by the user. Enter the text and click where you want the text to be written.
![]()
Deletes a "dimension". Select the dimension you want to delete and press ESC.
![]()
Select the dimension you want to edit, change the text, and click OK.
![]()
This option lets you change the appearance of a "dimension"; a "dimension" can be drawn with or without a box. Choose ShowBox on or off, select a "dimension" and press ESC.
Repair model |
![]()
This option checks the coherence of the database information. Only use it if there are problems. When used, a window notifies repaired items and may give some warnings about incorrect entities.
Go to the first, previous, next, last section, table of contents.