DATA |
All the data that defines the problem and that is managed in the data menus, depends on the problem type and will change for every different problem type. The following help will describe the common interfaces to all the possible data.
Data for a problem is defined by the following parameters: conditions (see section Conditions), materials properties (see section Materials), units (see section Units, problem data (see section Problem data) and intervals data (see section Interval data) that define the problem. The conditions and materials have to be assigned to geometrical entities. It is also possible to define new reference systems (see section Local axes).
The various windows will differ in accordance to the specifications of the problem (thermoelastic, impact, metal-forming, etc.), the different types of elements (2D or 3D, beams, shells, plates, etc.) and also the different requirements and specifications of the particular solver.
All the commands and facilities that are explained in this manual are generally available for the different solvers. However, there may be some commands and facilities that are only available to some of them and therefore some displays can look slightly different from those explained on these pages.
Problem type |
![]()
This option permits to select between all installed problem types. When selecting a new problem type, all information about materials, conditions and other data parameters that were already selected or defined is lost.
Note: When defining a new problem type, as this is not installed, it must
be selected by other means. One possibility is to use the 'Load...' possibility
in the 'problem types' menu. Another possibility is to use the following commands
in the right buttons menu or written in the command line:
data defaults problemtype.
One problem type is considered to be installed when it is copied to the
GiD problemtypes directory or inside another subdirectory inside this.
Note: Instead to copy the problemtype to the problemtypes directory it is
also possible to create only a Windows shell link (a direct access), or a UNIX link,
pointing to the real location. This option is especially interesting for developers,
avoiding duplicate the code.
Transform problem type |
![]()
This option can be found inside Problem type menu and is useful
to actualize one model from an old problem type to a newer one that is
similar to the first.
When converting, it tries to maintain all the conditions and materials assigned to the geometry or mesh. Also, it tries to maintain the rest of the data.
It will be typically used when a problem type has been updated and is necessary to use again a model defined with the old version.
Internet Retrieve |
Internet retrieve window
With this option it's possible to download new problem type's or update existing ones.
Note: it's necessary to be connected to the internet to use this option.
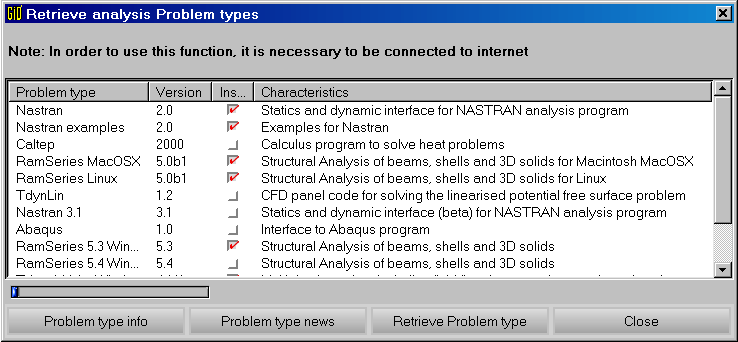
Select a list item and use the buttons Problem type info and Problem type news to get information about them.
Use button Retrieve Problem type to download the selected Problem Type.
The problemtype will be installed inside the problemtypes directory.
Load |
![]()
Option Load... permits to enter one installed problem type
that is in the current or in other directory. This possibility is useful when developing
a new problem type and it cannot be installed until finished, or the developer
has not write permission inside the problemtypes directory.
Unload |
![]()
This option unloads the problemtype in use.
Sometimes is more easy to work with a model that does not have an associated problemtype, or to send this model to other user that doesn't have this problemtype.
Debugger |
![]()
This tool is a graphical debugger for the scripting lenguage Tcl/Tk.
This debugger has additional capabilities like:
- Editing the code. It is possible to edit the code inside its own editor and resend the new code without closing the debugged program.
- The Tcl/Tk source code is colorized and supports automatic indentation.
- When stopping the debugger is one source code line, it is possible to view all the variables and expression values, as well as change them.
- It has additional options to measure execution times in the debugged program.
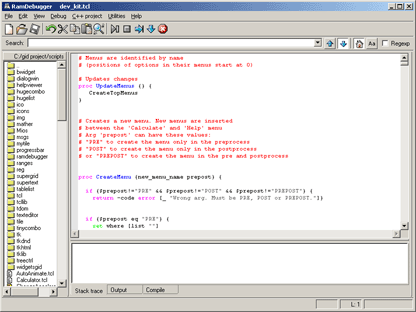
Tcl/Tk debugger window
It is possible to use Tcl/Tk to enhance a problemtype (see see section TCL/TK EXTENSION).
Tcl code can be invoked inside GiD from a problemtype (.tcl, .bas, .bat or .xml files),
from user defined macros, from a batch file, etc.
Can read more help about this debugger inside its own help
Conditions |
![]()
Conditions are all the properties of a problem (except materials), that can be assigned to an entity.
One example would be the boundary forces and displacement constraints in a solid
mechanic analysis or initial velocities in a CFD analysis. Information about contact
between master-slave nodes can also be considered as conditions.
Caution: If a mesh has already been generated, any change in the condition assignments, requires to mesh again to transfer these new conditions to the mesh. If this new generation has not been made, user will be warned when the data for the analysis is being written.
Assign condition |
The condition is assigned to the geometric entities or layers with the given field values.
If assigning from the command Assign Cond, the option Change
allows the definition of the field values. Do not forget to change these values
before assigning. Option Delete all erases all the assigned entities of
this particular condition.
Conditions can be assigned both on the geometry and on the mesh but it is advisable to assign them on the geometry and the conditions will then be automatically transferred to the mesh. If assigned on the mesh, when remeshing, conditions are lost.
Option Unassign inside AssignCond, permits to unassign this
condition. It is also possible to unassign from only certain entities that have
an specified field value.
Caution: If a mesh has already been generated, for any change in the condition assignments, it is necessary to mesh again.
Some conditions may have a behaviour that depends on the type of the chosen axes.
The user can choose whether to use global axes or any of the local axes previously
described with the command Local axes (see section Local axes), or, alternatively,
another option of automatic local axes calculations. In this latter case,
different axes are created
according to the adopted criteria of tangency and orthogonality with the geometry.
Draw condition |
Option Draw all draws all the conditions assigned to all the entities.
This means to draw a graphical symbol or condition name over
every entity that has this condition.
If one particular condition is selected, it is possible to choose Draw only
some field. Draw is like Draw all but only for one particular
condition. If one field is chosen, the value of this field is written over
all the entities that have this condition assigned.
When the condition has any field referred to the type of axes, the latter can be
visualized by means of Draw local axes.
Option Draw colors Draws groups of entities with different colors depending
on the values assigned to them for this condition.
The user can apply all graphical functions (zoom, rotate, ...) and all
the condition symbols are maintained in active mode in the graphical window until
the user selects escape or presses Finish in the conditions window.
Unassign condition |
In window mode, command UnAssign lets the user choose between several
possibilities:
- Unassign one condition from some selected entities.
- Unassign one condition from all the entities that may have this assigned.
- Unassign all conditions of a book from all the entities that may have them assigned.
- Unassign all conditions from all the entities that may have them assigned.
In command mode UnAssing, do it for all the conditions. To unassign only
one condition, use command Delete All (see section Assign condition).
Materials |
![]()
For any problem that needs definition of materials, there is a database of existing materials that can be assigned to entities. The user can also create new materials derived from existing ones and assign them as well.
Caution: If a mesh has already been generated, for any change in the assigned materials, it is necessary to mesh again or assign the materials directly to the mesh. If only the material definition is changed (change some field value) then is not necessary to re-mesh again.
Assign material |
The material is assigned to the selected entities.
The user must select the entity where to assign the materials over: point, line,
surface or volume when working in geometry mode or directly over the
elements when working in mesh mode.
Note: The material cannot be applied over nodes, the material assigned to points only will be transferred to 1-node elements if generated, but not to nodes.
If assigning from the command line, option UnAssignMat erases all the assignments
of this particular material.
Caution: Although a mesh had been already generated, for any change in the assigned materials, it is necessary to mesh again or assign the materials directly to the mesh.
Draw material |
This option draws a color indicating the selected material for all the entities
that have the required material assigned. It is possible to draw just one
material type or alternatively, draw
all materials. To select some of them use a:b and all material numbers
that lie between a and b will be drawn.
Unassign material |
In window mode, command UnAssign lets the user choose between several
possibilities:
- Unassign one material from some selected entities.
- Unassign one material from all the entities that may have this assigned.
- Unassign all materials from all the entities that may have them assigned.
Command Unassign unassigns all the materials from all the entities. For
only one material, use UnAssignMat (see section Assign material).
New material |
When using command NewMaterial, a new material is created taking an existing
one as a base material. Base material means that the new material will have
the same fields as the base one. Then, all the new values for the fields can be
entered in the command line.
It is possible to redefine an existing material.
To create a new material or redefine an old one in the materials window, write
a new name or the same one and change some of the properties. Then, push
Accept.
Exchange material |
It is possible to import and export materials from the model database to one external database. Typically, one centralized database of materials is maintained and every new model gets its properties from there.
Note: If it is desired to interchange materials with the
Problem type database, it is necessary to check that the current
user has enough permission to read/write in that directory.
Units |
![]()
Units refers to the units defined in the problem. This option only appears if the problemtype loaded have units defined.
User must declare the length units of the current model, and the unit system to be used when writting coordinates and data properties in the calculation file (values will be converted from the current units to the selected system units)
It is possible to set an user unit system, but this feature can be disabled (see section Unit System file (.uni)).
Problem data |
![]()
Problem data refers to all the data that is general to the problem. This means that it is not related to a geometrical entity and it does not change in every interval of the analysis.
It can be entered with the command ProblemData or in the problem data
window.
If entered in a window, the data is not accepted until the button Accept is pressed.
This data can be entered before or after meshing.
Intervals |
![]()
Intervals are a way to separate some information into several groups. The information that can be duplicated for every group can also be duplicated, if desired. When a new interval is defined, it is possible to copy all the new information about conditions, assigned to entities or not.
Therefore, the correct way to work is to define all the conditions first and afterwards create the new intervals.
Options are:
- New: It is allowed to define as many intervals as desired with this command. When creating a new one, user can choose whether copy the assigned conditions or not. To copy them, conditions must already be assigned (see section Conditions).
- Current: Chooses the current interval to use. Next assigned conditions or interval data (see section Interval data), will be considered inside this interval.
- Delete: Deletes one existing interval and all its related data.
These groups called intervals can be used to change some conditions or information like increment factor in an incremental analysis. It may also be useful to define some load states for the same geometry.
Interval data |
This is the amount of information that is maintained different for every interval (see section Intervals).
It can be entered with the command IntervalData or in the intervals data
window.
If entered in a window, the data is not accepted until button Accept is pressed.
This data can be entered before or after meshing.
Local axes |
![]()
With this option, GiD allows to define new different coordinates reference systems. It is possible to write them, not only as cartesian reference systems, but also referring to as Euler angles. All user defined systems are automatically calculated and can be visualized one by one or all together.
There are several ways to define new local axes:
3 Points XZUser enter three points that corresponds to the origin, the X-direction and the Z-direction. The origin and the last introduced point define the Z-axis, whereas the second point indicates the side of thex-zplane where the point lies.X and angleUser enter 2 points and one angle. The first one is the center, the second one indicates the X-axe and the angle indicates the position of the Y and Z axes. In the graphical window, it is possible to set dynamically this angle by moving the mouse. It also indicates where the origin of the angle is. The angle can be either enter by pressing the mouse or by entering the exact value in degrees.
When defining local axes, the definition mode is done through three points
3PointsXZ.
Local axes can later be used when creating a point (see section Point creation) or in some conditions that have a field related to these axes (see section Conditions).
Go to the first, previous, next, last section, table of contents.