VIEW |
Visualization commands change the way to display the information in the graphical window. They do not change any definition of the geometry or any other data.
Generally, they can be used within any other command without leaving it. When the visualization process finishes, the first command continues.
They can be accessed either from the top menu View or form the
right mouse button (most of them).
Zoom |
![]()
![]()
![]()
![]()
![]()
Zoom is used to change the visualized size of the objects without deforming them. This only enlarges or reduces the objects and changes the orthogonal perspective of the window.
-
Zoom in:Pick inside the graphical window. A dynamic rectangle is opened. Pick again and the visualization changes to display only the part within the defined rectangle. -
Zoom out:Pick inside the graphical window. A dynamic rectangle is opened. Pick again and the visualization changes so that everything in the graphical window is reduced to the size of the rectangle. -
Zoom dynamic:Moving mouse horizontally, view is enlarged or shortened. It uses the position of the mouse the first time is pressed as center of the enlargement or shortement. -
Zoom previous:GiD goes to the previous saved zoom. -
Zoom next:If one previous zoom has been made, this option goes to the one after the current view in the stack list. -
Zoom frame:Choose a visualization size so as to display everything inside the window. -
Zoom points:User enters two points (see section Point definition), and a visualization size is chosen so as to display these two points inside the window. This option appears only in the right side commands menu (see section USER INTERFACE).
Note: Instead of picking twice to begin and end the rectangle, it is possible
to maintain the left mouse pressed and move the cursor.
Rotate |
![]()
![]()
![]()
There are various ways to make a rotation in order to change the graphical view of the geometry, without changing it.
Note: Instead of picking twice to begin and end the rotation, it is possible
to maintain the left mouse pressed and move the cursor.
Rotate trackball |
With this option, a dynamic rotation is made, resembling a trackball device. It means that when picking over a geometry point with the left mouse and moving the mouse, the geometric point tries to follow the mouse pointer. This can be imagined as a ball over the graphical window which is moved with the mouse.
The left mouse button can be pressed several times to connect and disconnect the
movement. To leave this function, use escape (see section Escape).
Rotate screen axes |
With this option, a dynamic rotation about the screen axes is made. Screen axes are defined as:
-
X-axis: A horizontal axis. -
Y-axis: A vertical axis. -
Z-axis: An axis orthogonal to the screen.
When entering this command, Z-axis is set by default and moving the mouse
to the left or to the right will rotate the geometry around this axis. Picking the
left mouse changes the axis. To leave this function, use escape
(see section Escape).
To change the axes is also possible by entering the letters x, y or
z in the command line.
To move the geometry by a fixed angle, enter the number of degrees, positive or negative, in the command line.
Rotate object axes |
With this option, a dynamic rotation about the object axes is made. Object axes are the global axes in the position they are in that particular moment. i.e. the axes currently drawn in the graphical window.
When entering this command, Z-axis is set by default and moving the mouse
to the left or to the right will rotate the geometry around this axis. Picking the
left mouse changes the axes. To leave this function, use escape
(see section Escape).
To change the axes is also possible by entering the letters x, y or
z in the command line.
To move the geometry by a fixed angle, enter the number of degrees, positive or negative, in the command line.
Rotate center |
The default center of rotation is defined approximately in the center of the geometry.
If it is desired to change this center, use this command and enter a point
(see section Point definition). This new rotation center will be maintained until the
next zoom frame (see section Zoom).
In the contextual menu, i.e. the menu which appears when the right button of the mouse is
pressed over the graphical window, the option 'Automatic rotation center' / 'No automatic
rotation center' is listed. If this option is active, on each 'Zoom In' / 'Zoom Out' / 'Pan'
the nearest point of the geometry, or mesh, to the screen center will be selected as
rotation center for the next rotations. This variable is also present in the
Utilities -> Variables right buttons menu.
If a new Rotation center is selected, then this option is deactivated.
Rotate angle |
This option appears only in the right side commands menu (see section USER INTERFACE).
The new position of the geometry after the rotation can be defined as the direction orthogonal to the screen via a pair of angles:
-
The angle in the plane XY starting from the
X-axis. -
The elevation angle from the
XYplane.
As an example, the initial view (orthogonal to the Z-axis and with the X-axis horizontal) can be obtained with:
rotate angle 270 90
Rotate points |
This option appears only in the right side commands menu (see section USER INTERFACE).
The new position of the geometry after the rotation can be defined as the direction orthogonal to the screen via a pair of points:
- The target point, the point to look at.
- The viewpoint, the point to look from.
Plane XY (Original) |
This option changes the view to the original one: screen orthogonal to the Z-axis with the X-axis lying horizontally and pointing to the right.
Plane XZ |
This option changes the view to: screen orthogonal to the Y-axis with the X-axis lying horizontally and pointing to the right.
Plane YZ |
This option changes the view to: screen orthogonal to the X-axis with the Y-axis lying horizontally and pointing to the right.
Pan |
![]()
![]()
![]()
Two points:With this command, the location of the geometry is displaced in the graphical window. To do this, pick two points in the graphical window.Dynamic:In this case the displacement is made dynamically, moving the mouse horizontally.
Redraw |
![]()
![]()
![]()
This command redraws the geometrical model or the mesh (depending on the visualization
Mode (see section Mode) )in the graphical window. For those machines
that include overlays, all the layers that stay underneath are not affected, so the
redraw goes faster and the underneath drawings remain untouched.
Render |
![]()
![]()
By using this option, the way of viewing the model changes. There are three main options:
-
Normal:This is the usual way of visualizing. The geometry and mesh are viewed including all definition lines. -
Flat lighting:Solid model with flat illumination and lines. -
Smooth lighting:Solid model with smooth illumination (better quality). -
Change light direction:With this option the user can change the VECTOR of the render light direction interactively or just entering the VECTOR components on the command line. -
Customize:User can define an own render, with its own properties.
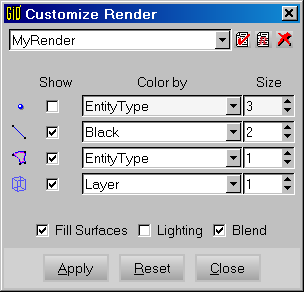
Customize render window
View->Rendermenu or in themouse menu, next to standard GiD render modes.
It can be distinguished the render of a volume mesh from the render of its contour surfaces by the different way of representing the elements (boundary elements in case of volume, and elements in case of surfaces):
-
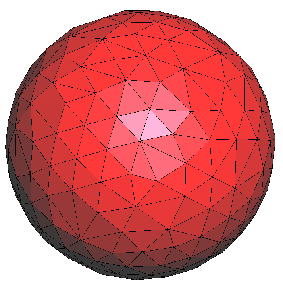
Volume mesh render:Boundary faces of volume mesh elements are shown colored with the color of layer witch volume owns to, with thick black borders.
Volume mesh render
-
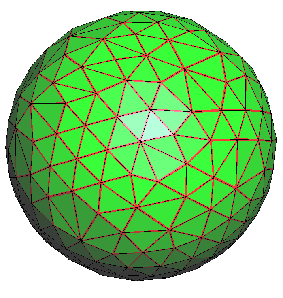
Surface mesh render:Surface elements are represented as usual, colored with the color of layer witch surface owns to.
Surface mesh render
-
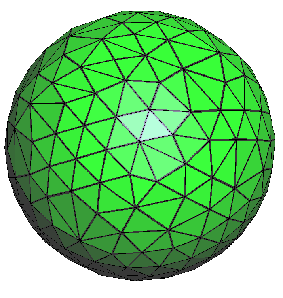
Volume and surface mesh render together:Boundary faces of volume mesh elements are shown as in "Volume mesh render" case, but the thick borders are colored with the color of layer witch contour volume surfaces owns to. In the picture below, volume layer is green and contour volume surfaces' layer color is red.
Volume and surface mesh render together
Note: It can be shown the rendering of a volume mesh seeing only the boundary faces
as they were surface elements by using the option View mesh boundary (see section View mesh boundary).
Note: Quality of visualization is controlled via preferences (see section Preferences).
Perspective |
![]()
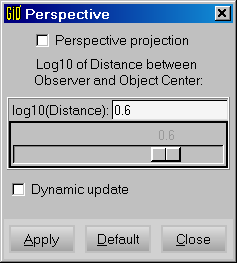
Perspective window
By default, a model is viewed inside GiD using orthogonal projection.
With this option, it is possible to change to a perspective projection. In this mode, the user can choose a distortion factor for the perspective. This can be updated dynamically.
Clip planes |
![]()
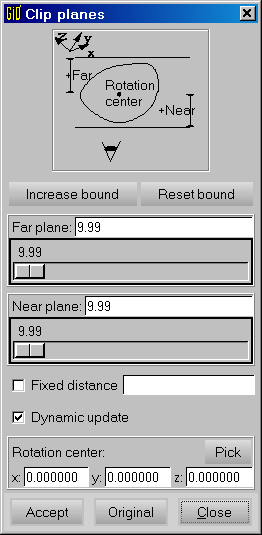
Clip planes window.
This window allows to hide the front or the back of the view
Clip planes is a way not to draw the geometry or mesh that is very close or very far to the viewer.
Moving Near plane, hides the geometry that is closer to the viewer.
Moving Far plane, hides the geometry that is further to the viewer.
To see the changes dynamically, select Dynamic update.
Option Fixed distance, allows a constant distance between both planes.
A new rotation center can be chosen or selected from the window.
Option Increase boundaries, increments the ends in the bars of Far
plane and Near plane.
Note: All this information is reset when performing a
zoom frame.
(see section Zoom).
Label |
![]()
![]()
With this option, the labels of the entities are drawn or not. It is possible to
select some entities or to apply this option to all entities viewed in the
graphical window.
To select some entities, choose select before applying on the
Points, Lines, Surfaces or Volumes. Then, select entities
in the usual way (see section Entities selection). Options are:
-
All:All entities in the graphical window will have their labels drawn. -
Points, lines, surfacesorvolumes:Ifselectis not set, all the entities in the graphical window will have their labels drawn. -
Off:No label of entity is drawn.
Entities |
With this option, it is possible to choose some of the points, lines, surfaces or volumes to be drawn. It is useful to make drawing faster or clearer in some instances.
Note: this option is only available in the right buttons menu (see section USER INTERFACE).
Normals |
![]()
![]()
This command allows to see lines sense or surfaces normals drawn.
-
Command
Normals Lines:draws the sense of the selected lines. If the line lies on the planez=0, apart from the sense, GiD displays the normal of the line in 2D.
-
Command
Normals Surfaces:draws the normals of the selected surfaces.
There are two ways of viewing surface normals:Normal(as an array) orColored(front and back face of the surface is colored different).
Surfaces belonging to the planez=0will have, by default, its normal oriented towards the z positive. Then, they are defined as anti-clockwise surfaces in 2D.
Viewing commands (zoom, rotation, etc.) can be applied and the normals remain on the screen.
It is possible to swap the sense of lines or surfaces using the Swap normals
command (see section Swap normals).
Higher entities |
![]()
With this option, it is possible to view geometry entities differently colored corresponding to its higher entity number. Higher Entity number is the number of entities which entity belongs to.
If mesh mode is set, user can view the higher entities of mesh nodes.
Save/Read View |
![]()
![]()
These two options permits to save the actual view configuration into a
file. Then, that configuration can be loaded using the View->Read command.
Background Image |
![]()
An image can be used as background of GiD for visualization purposes (supported image formats are .bmp and .ppm). There are the following options:
- Fit screen: an image will be fitted into GiD's background window.
- Real size: the image will not be deformed; the image is placed in a plane. Three points must be entered: two of them to define the line where the bottom line of the image lies, and a stand-up point, which defines the upper direction of the image.
- Default: use this option to use the default background.
Image to clipboard |
![]()
This option takes the image of the model in the actual view and send it to the clipboard, to be pasted afterwards wherever user wants.
Multiple windows |
![]()
Command Multiple windows permits to have several views of the
same project. Different views can be displayed inside the program main window or in supplementary windows.
Mode |
![]()
This command allows to choose the working GiD mode (Preprocess or Postprocess), and the different visualization options in each mode:
In Preprocess: This command allows to set Mesh or Geometry visualization.
Toggle command changes from one to other visualization. If mesh doesn't exists and mesh visualization is selected, the user is asked to generate it.
In Postprocess: This command allows to set Graphs or Mesh visualization.
Go to the first, previous, next, last section, table of contents.