POSTPROCESS OPTIONS |
Introduction |
![]()
![]()
This chapter describes some relevant aspects of the Postprocessing step and the way to load results from a numerical analysis into GiD.
In the GiD postprocess you can study the results obtained from a solver program. The GiD postprocess receives mesh and results information from the solver module. If the solver module doesn't create any new mesh, the preprocess mesh is used.

The communication between the solver and the GiD Postprocess is made using files.
The solver program has to write the results in a file that must have the extension .post.res, or the old .flavia.res, and its name must be the project name.
If the solver writes a mesh, the file must have the extension .post.msh, or the old .flavia.msh. ( see section POSTPROCESS DATA FILES )
The extensions .msh and .res are also allowed, but
only the files with the extensions .post.msh, .post.res and
the old ones .flavia.msh and .flavia.res
will be automatically read by GiD when postprocessing the GiD project.
There are two ways to postprocess inside GiD:
- Postprocess inside a GiD project: Starting GiD and open the GiD project (
ProjectName.gid) you want to postprocess, and then select thepostprocessoption from thefilesmenu or click on thepre/posttoolbar button. This way theProjectName.flavia.res, or the oldProjectName.flavia.res, will automatically be read by GiD, and theProjectName.post.msh, or the oldProjectName.flavia.msh, if present. - Postprocess other files: Starting GiD and, directly, select the
postprocessoption from thefilesmenu or click on thepre/posttoolbar button. Now open the pair filesOtherModel.mshandOtherModel.res.
Once inside the postprocessing section of GiD, all the visualization features and management options of the preprocess section are available: Zoom, Rotate (Rotate screen/object axes, Rotate trackball,etc.), Pan, Redraw, Render, Label, Clip Planes, Perspective, etc.
Note: There is no need to load a project into GiD to use its Postprocessing; you can open directly the mesh and results information directly from the GiD postprocess. ( see section Files menu )
Files menu |
![]()
Several useful options has been added inside the Files menu:
- New: Clears all postprocess information present in GiD.
- Open: Read postprocess information into GiD.
- Open multiple:
With this option the user can read multiple meshes (pairs of .msh and .res, or .bin files) into GiD. This is usefull, for instance, when an analysis is doen, where remeshing in somes steps is required, or in each one of them. By now, each diferent mesh should be written in a separate
Project.post.mshfile with its ownProject.post.resresults file. From the file browser window, the user can select several files by clicking with the left mouse button and ending its selection with <Shift>-click, or add and remove files with <Ctrl>-click. Normal operations, such as animation, displaying results and cuts, can be done over these meshes, and they will be actualized when the selected analysis/step is changed, for example by means of 'View results->Default analysis/step' (see section Re-meshing and adaptivity). - Merge: Reads mesh and results information from an ASCII or a binary file and add them to the current ones. If node are already present inside GiD, they will be overwritten. No renumeration is done.
- Import:
- NASTRAN mehs: read NASTRAN mesh file.
- FEMAP / TECPLOT file: reads FEMAP Neutral ASCII files and TECPLOT 9.0 ascii and binary files.
- 3DStudio: Reads a mesh in
.3ds3DStudio format.
- Cuts: to read cut planes, cut wires, iso-surface cuts into GiD so the same cuts and cut-spheres can be used among several postprocess meshes.
- Graphs: to add graphs to the already, or not, created ones inside GiD.
- Export:
- ASCII files: saves meshes, sets and results into ASCII files using the new PostProcess format
see section Postprocess results format: ProjectName.post.res, ProjectName.flavia.res,
see section Postprocess mesh format: ProjectName.post.msh, ProjectName.flavia.msh.
If multiple meshes are read with the '
Open multiple' option explained above, only two files will be saved, one for the meshes and another one for the results, where each post information file ( or pair .msh + .res) will define a Group (see section Re-meshing and adaptivity). - As one binary File: saves meshes, sets and results into one binary file.
If multiple meshes are read with the '
Open multiple' option explained above, only two files will be saved, one for the meshes and another one for the results, where each post information file ( or pair .msh + .res) will define a Group (see section Re-meshing and adaptivity). - Binary results: saves only results information, so the pass between pre and postprocess will be quicker.
- ASCII boundaries: saves the boundaries of the meshes and sets, with its nodal results, into ASCII files ( one for mesh information ".msh", and one for the results ".res"). The boundary of an hexaedra/tetrahedra mesh is a quadrilateral/triangle mesh. The boundary of a quadrilateral/triangle mesh is a line mesh. There is no boundary of a line/point mesh.
- Cut: save cut planes, cut wires, iso-surface mesh cuts so the same cuts can be used among several postprocess meshes. Also cut spheres.
- Graph: saves graphs in ASCII ( gnuplot) format. If the
option
Allis chosen, the user will be asked for aprefix. Then, GiD will create a file for each Graph with the namesprefix-1.cur,prefix-2.cur,prefix-3.cur and so on . . . - Cover Mesh: after visualizing the cover mesh of the points/nodes, this mesh can be saved for other uses.
- ASCII files: saves meshes, sets and results into ASCII files using the new PostProcess format
see section Postprocess results format: ProjectName.post.res, ProjectName.flavia.res,
see section Postprocess mesh format: ProjectName.post.msh, ProjectName.flavia.msh.
If multiple meshes are read with the '
- Preprocess: allows the user, after confirmation, to return to the pre-processing section of GiD.
The rest of the options are the same on the preprocess part.
Utilities |
![]()
Inside the Utilities menu, the options Id, Signal, Distance and Calculator have the
same functionality as in the Preprocess (see section UTILITIES). Other options of the Utilities menu are slightly different:
Status: a window appears showing the general postprocess status: number of meshes, elements, etc.
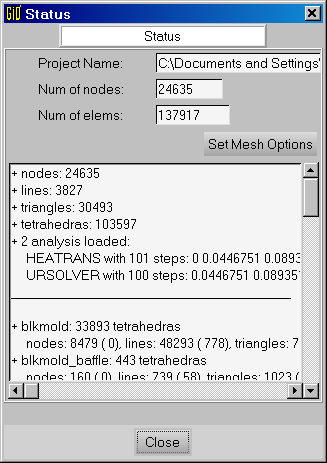
status window
List- Nodes: a window appears showing information about selected nodes: its coordinates,
the current visualized result, and all other nodal results defined over the selected nodes.
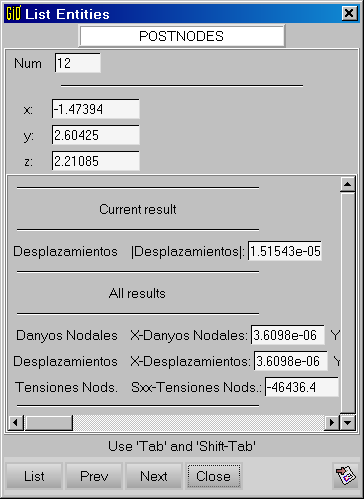
list nodes window
- Elements: a window appears showing information about selected elements: its connectivity,
the gauss points defined on the selected elements, the current visualized result, and all
other results defined over the gauss points of the selected elements.
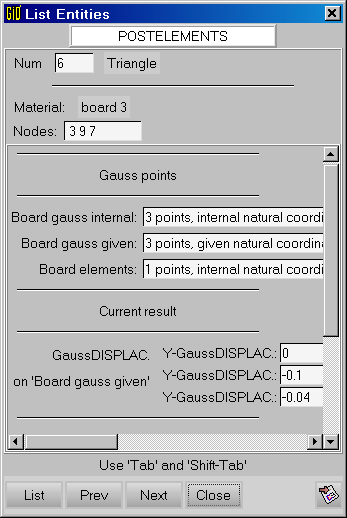
list elements windows
 .
.
- Nodes: a window appears showing information about selected nodes: its coordinates,
the current visualized result, and all other nodal results defined over the selected nodes.
Collapse: to collapse nodes that are together in a set.Join: to join several sets into one.Delete: to delete meshes, sets and cuts.Texture: to add textures to sets see section Textures.
The Copy utility introduces some changes:
![]()
![]()
When choosing the Copy utility the Transformations window appears. This window allows the user to repeat the the visualization using translation, rotation and mirror transformations, so that GiD can draw a whole model when only a part of it was analyzed:
Transformations Window
Transformations types are:
- Translation: It is defined by two points. Relative movements can be obtained defining the first point as 0,0,0 and considering the second point as the translation vector (see section Point definition).
- Rotation: It is necessary to either enter two points in 3D or one point in 2D. These two points define the rotation axis and its orientation. In 2D, the axis goes from the defined point towards z positive. Enter the angle of rotation in degrees. It can be positive or negative. The sense is defined by the right hand rule. In 2D, the sense is counter-clockwise.
- Mirror: It is defined by three points that cannot be aligned. These points form a plane that is the mirror plane. In 2D, the mirror line is defined by two points.
Available options are:
- Copies: Giving the number of repetitions, the operation selected is performed this number of times.
- View: The transformation is only for viewing purposes.
Show/Hide,UndoandClearoptions are enabled. - Create: All the Post information (meshes & results) will be duplicated when doing the transformation.
The options
Show/Hide,UndoandClearare disabled. - Show/Hide Transform.: allows the user whether to see the original model, or the one with the transformations active.
- Undo: Deletes last transformation done. It can be used repeadly to clear all the transformations done.
- Clear: Clear all the transformations at once.
Button DoIt tells the program to do the transformation selected.
Point and Line options |
![]()
![]()
As points and lines can be viewed, there are several interesting options for each of them.
- Point options:
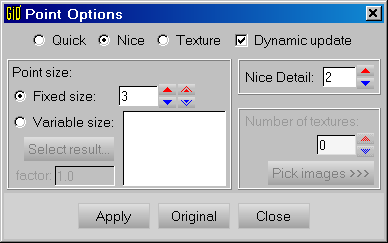
Point options window
Quick,Niceor with the center of aTextureglued to the point.
Quick: points will be drawn as big dots.
Nice: points will be drawn as little spheres (quadrilateral meshes).
For every draw style, thePoint Sizecan be changed, but ranges vary betweenQuick, which depends on the graphics library, andNiceandTexture.
When theNicestyle is selected, theNice detaillevel can be adjusted. The number represents the number of vertical and horizontal subdivision of a sphere.
Note: The changes affect all the points representation: point elements and the arrow head of vectors when using thePointdetail level see section Display vectors.
- Line options:
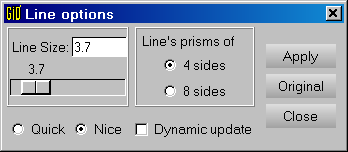
Line options window
Quickstyle or aNiceone.
Selecting aLine Sizeof 0.0 in theNicestyle, will cause the lines to be not drawn.
Quick: lines are drawn as 3-point thick lines. The line size is fixed.
Nice: lines are drawn as long 4-sided or 8-sided prisms. The size, width, of the lines can be changed.
When the lines are drawn nicely, the number ofsides of the prismused to draw them can be changed between 4 and 8 sides.
Note: Line options no longer affect the stream lines as before, but only the line elements. For stream lines options see section Stream Lines.
Display Style |
![]()
There is a View Style window, where almost all the interesting visualization
options can be adjusted which only deals with meshes, sets or cuts, and not with results.
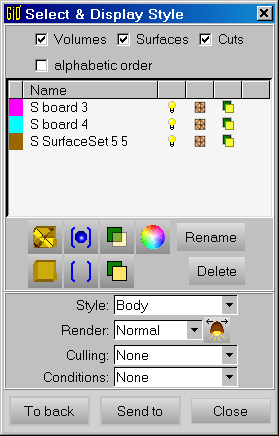
Display Style Window
Selecting Volumes, Surfaces and/or Cuts, the user can switch them On and Off,
Delete them, after confirmation, or rename them.
Also, clicking on a Volume, Surface or Cut, and pressing
Color... the user can change the colour look, or its Ambient, Diffuse, Specular
and Shininess components, of the selected set, or give it its Default color
back. The Diffuse component is used for all the representation, while the rest
(Ambient, Specular and Shininess) has more sense for Render
visualization.
Under the menu Style the user can choose how volumes, surfaces and cuts should be drawn. These options are:
- Boundaries:
All the edges of the boundaries and surface elements will be displayed, in black.
An edge is the line that only belongs to one surface element, or the one that
belonging to two surface elements, its faces form an angle less than a
predefined one. This angle can be specified by the user in
Results Options BorderAngleon theRight Buttonsmenu. - Hidden Boundaries: The same as before, but here the edges that are behind the volumes, surfaces and cuts are removed.
- All Lines: All the lines of surface elements are drawn. When drawing volumes, GiD only draws the surface/boundaries elements of this volume mesh. How GiD can draw these interior elements is explained below. Each volume, surface and cut is drawn with its own colors.
- Hidden Lines: The same as before, but here the lines that are behind the volumes, surfaces and cuts are removed.
- Body: The elements of volumes, surfaces and cuts, are drawn in filled mode, i.e. they are drawn as solid elements. Each volume, surface and cut is drawn with its own colors. It can be very hard to recognize the shape of the meshes if no illumination is active.
- Body Boundaries:
Same as before, but with
Hidden Boundariesdrawn too. - Body Lines:
Same as before, but with
Hidden Linesdrawn too. - Points: the nodes of the meshes are drawn.
With the Render menu the user can select how to see the mesh:
Normal- no lightingFlat- lighting with sharpen edgesSmooth- lighting with smoothed edges
Also the light direction can be changed with the lamp icon button.
Near the Culling label, the user can choose whether the Front Faces,
Back Faces, Front and Back Faces are culled, i. e. not drawn, or No Faces
are culled. This option is useful to look into volume meshes, etc.
Conditions can also be drawn if they are present in preprocess, not only geometry conditions
but also mesh conditions.
Following options can be changed for each mesh/set/cut separately:
The Massive option allows the user to see the elements that are inside a volume mesh,
and to draw all the vectors inside of a volume/surface/cut when a Boundaries display style
is used.
With the Transparent option the volumes/surfaces/cuts will be drawn transparently or opaque,
so that, for instance, iso surfaces inside them can be viewed easily.
Textures |
![]()
In GiD it is also possible to assign a texture to a Set. Inside the menu Utilities->Texture there are several options:
- View No / Fast / Nice: to switch whether to view the textures over the
sets or not. When the texture is small, so that a pixel of the textures
must be drawn over several pixels on the screen, the
Fastmode just draws the pixels using the 'nearest neighbor' policy, and theNicetries to interpolate the colours of the pixels from the original. - Add Screen Map / To 4 Sided / BoundImg to BoundSet: to map a texture
to a set.
ScreenMap: by picking four points over the screen, GiD projects the texture, parallel to the screen, over the underlying sets.4 sided: tries to match the 4 sides of the texture to the 4 sides of the set. The best results are achieved using quadrilateral sets which are more or less flat, at least in one direction.BoundImg to BoundSet: looks for the border of the texture inside the image file and tries to glue it to the border of the set, for instance a texture circle to a circle set. - Change Flip Horiz. / Vert.: changes the orientation of the texture once it is applied to the Set.
Note: When the display style of the visualization is changed,
for instance from Body to Body Boundaries the visualization
of the texture is switched off. To view the texture, just select
Utilities->Texture->View->Fast/Nice.
Once the texture is applied to a Set, when the Set is deformed, the texture is deformed accordingly, so the deformed texture can be visualized.
Cover mesh |
![]()
Another feature in GiD is the calculation of the involving mesh of a set of points or nodes. To switch the visualization of this mesh on and off just select Options->Geometry->Covering mesh. After saying 'Yes' to the visualization of the covering mesh, the user will be asked for a number. This number is the distance between the covering mesh and the points.
This option is not only available for points, but also for every mesh/set present in GiD.
Note: This covering mesh is recalculated when the mesh is deformed. So in a particle movement system, the covering mesh will also move along with the particles.
This mesh can also be saved through Files->Export->Cover mesh.
Go to the first, previous, next, last section, table of contents.